
1. 웹 방화벽의 이해
1-1) 웹 방화벽이란?
- web Application Firewall 은 일반적인 네트워크 방화벽과 달리 웹 애플리케이션 보안에 특화되어 개발된 솔루션
- SQL Injection, Cross-Site Scripting(XSS) 등과 같은 웹 공격을 탐지하고 차단하는 것
- 직접적인 웹 공격 대응 이 외에도, 정보유출 방지 솔루션, 부정 로그인 방지 솔루션, 웹 사이트 위변조 방지 솔루션 등으로 활용이 가능함
[장점]
- https 통신(SSL/TLS) 을 사용하면 > 사용자와 웹서비스 구간에는 종단간의 암호화가 이루어짐 (=7계층은 모두 암호화된다)
- 이 구간은 IPS, IDS가 잡지 못한다 > 중간의 암호화된 패킷은 볼 수 없다
- 사용자와 웹서비스 중간에 웹방화벽이 놓여서 서로 암호화되어 통신을한다
- 사용자 <---암호화---> 웹방화벽 <---암호화(SSL/TLS)---> 웹서비스
- 웹방화벽은 데이터 영역(7계층)을 해석하기때문에 들어오는 공격들(SQL Injection, XSS)을 탐지하고 차단할 수 있다
=> 방화벽, IPS, IDS가 하지 못하는 것들을 WAF가 보조해주므로 필수이다!
1-2) ModSecurity
- 웹에 특화된 방화벽
- Apache 모듈로 개발되었으며, 현재 NGINX 및 IIS 서버에도 적용 가능
- plugin 형태이다
[KISA 안내문]
- Apache 웹 서버에서 동작하는 오픈 소스 웹 방화벽
- 소스의 재사용 및 재생상된 프로그램의 공개 조건인 GNU GPL을 따르는 공개 버전과 ModeSecurity의 개발사인 Breach Security의 상업용 버전이 존재한다
[주요 특징]
| 요청 필터링 | 클라이언트로부터 웹 요청이 들어올때, 웹서버나 다른 모듈들이 처리하기 전에 ModeSecurity가 요청 내용을 우선 분석해서 필터링한다 |
| 우회 방지 기술 | - 경로와 파라미터를 분석하기 전에 정규화시켜 우회 공격을 차단한다 - 즉, "//","\/", ".","%00" 등 우회 공격용 스트링을 제거하고, 인코딩된 URL을 디코딩한다 |
| HTTP 프로토콜 이해 | 엔진이 HTTP 프로토콜을 이해하기 때문에 전문적이고 정밀한 필터링을 수행한다 |
| POST 페이로드 분석 | GET 방식 + POST 메소드를 사용해서 전송되는 컨텐츠도 분석 가능하다 |
| 감사로깅 | - POST를 포함하여 모든 요청의 모든 상세한 부분들까지 추후 분석을 위해서 로깅될 수 있다 - ModSecurity에서 차단기능을 비활성화시킨 후 , 강력한 로깅 기능만으로 침입탐지시스템 역할을 수행할 수 있도록한다 |
| HTTPS 필터링 | 웹방화벽에 인증서를 넣어두면 복호화한 후 데이터 접근하여 HTTPS 통신 공격도 필터링할 수 있다 |
[장점 및 단점]
장점
- 쉬운 설치 및 Rule 설정 가능
- 다양한 종류의 WAS(Apache, IIS, NGINX) 에 적용 가능
- Rule을 직접 제작하거나 이미 존재하는 rule을 다운로드하여 적용 및 관리 가능
단점
- 설정이 변경되면 웹서버의 재시작이 필요하다
- GUI 기능을 제공하지 않아서 > 추가, 변경 작업이 불편하다
1-3) WebKnight
- AQTROMiX에서 개발한 오픈소스 웹 방화벽 솔루션
[장점 및 단점]
장점
- GUI 제공 > 설정 및 로그 관리 쉬움
- 웹 기반 애플리케이션의 호환성이 좋다
- Runtime Update가 가능해서 웹 중단 없이 설정 변경 가능
- 방화벽 rule을 xml 파일로 저장 및 공유가 가능
단점
- Microsoft IIS Server에만 적용 가능
- 설치 이후 초기 방화벽 설정이 어려움
2. 웹방화벽 설치
1) ModSecurity 설치
1-1) Ubuntu 20.04 설치하기

id: user1
password: test1234
🚨 트러블 슈팅
NAT 대역에 두고 eth0을 DHCP로 받도록하려고했는데 안받아짐
NAT로 설정하면 Custom에있는 VMnet중에서 NAT 인 것에 할당되기때문이다
내가 원리 VMnet8을 NAT로 설정했는데 > 여기에 DHCP 옵션을 꺼둬서 IP 할당을 못받음

제대로 IP를 할당받은 거 확인

Mobaxterm에 접속

1-2) nginx 설치
sudo -i
apt update && apt install nginx -y
1-3) modsecurity 설치
1.3.1 modsecurity 설치 전에 필요한 패키지 설치
apt-get install -y apt-utils autoconf automake build-essential git libcurl4-openssl-dev libgeoip-dev liblmdb-dev libpcre++-dev libtool libxml2-dev libyajl-dev pkgconf wget zlib1g-dev
1.3.2 modsecurity를 깃헙 레포지토리에서 다운로드
git clone --depth 1 -b v3/master --single-branch https://github.com/SpiderLabs/ModSecurity
1.3.3 모드시큐리티 디렉토리로 접근해서 컴파일 수행
cd ModSecurity
git submodule init
git submodule update
./build.sh
./configure
make
make install
1.3.4 nginx 관련 데이터 다운로드 Modseucrity 모듈 컴파일
nginx 버전 확인
nginx -v

nginx version: nginx/1.18.0 (Ubuntu)
git clone --depth 1 https://github.com/SpiderLabs/ModSecurity-nginx.git
wget http://nginx.org/download/nginx-1.18.0.tar.gz
tar zxvf nginx-1.18.0.tar.gz

cd nginx-1.18.0
./configure --with-compat --add-dynamic-module=../ModSecurity-nginx
make modules
cp objs/ngx_http_modsecurity_module.so /usr/share/nginx/modules/ngx_http_modsecurity_module.so
objs/ngx_http_modsecurity_modul.so 파일이 없다는 에러 발생
ModSecurity-nginx 모듈은 “libmodsecurity(= ModSecurity v3 라이브러리)”가 이미 시스템에 설치돼 있어야 빌드가 되는데, 그 라이브러리가(특히 개발용 헤더/설정파일) 없어서 ./configure 단계에서 탈락한 것
해
apt install -y libmodsecurity-dev libmodsecurity3 pkg-config
1.3.5 다이나믹 모드로 로드하기
/etc/nginx/nginx.conf 파일 상단에 다음 내용 추가 (vim /etc/nginx/nginx.conf)
load_module modules/ngx_http_modsecurity_module.so;
1.3.6 모드시큐리티 설정 및 차단 활성화
mkdir /etc/nginx/modsec
wget -P /etc/nginx/modsec/ https://raw.githubusercontent.com/SpiderLabs/ModSecurity/v3/master/modsecurity.conf-recommended
mv /etc/nginx/modsec/modsecurity.conf-recommended /etc/nginx/modsec/modsecurity.conf
sed는 찾아바꾸기 애플리케이션이다. 특정 문서에서 원하는 부분을 찾아서 수정할 수 있다.
sed -i 's/SecRuleEngine DetectionOnly/SecRuleEngine On/' /etc/nginx/modsec/modsecurity.conf
- DectionOnly: 공격 코드를 탐지만한다
- On: 탐지와 차단 모두 한다
/etc/nginx/modsec/main.conf 파일을 다음과 같이 작성 vim /etc/nginx/modsec/main.conf
# From https://github.com/SpiderLabs/ModSecurity/blob/master/
# modsecurity.conf-recommended
#
# Edit to set SecRuleEngine On
Include "/etc/nginx/modsec/modsecurity.conf"

# Basic test rule
SecRule ARGS:testparam "@contains test" "id:1234,deny,status:403"
- 설정한 /etc/nginx/modsec/modsecurity.conf 파일을 참조하도록한다
- 테스트룰
- namver.com?testparam=test 라면(testparam이라는 파라미터에 test가 들어있다면)
- id:1234 > 룰의 id
- deny > 이런 패킷을 거절하겠다
- status:403 > 403으로 뜨도록하겠다
/etc/nginx/sites-available/default에 다음 두라인 추가 = modsecurity를 nginx에 적용했다
vim /etc/nginx/sites-available/default
server {
    # ...
    modsecurity on;
    modsecurity_rules_file /etc/nginx/modsec/main.conf;
}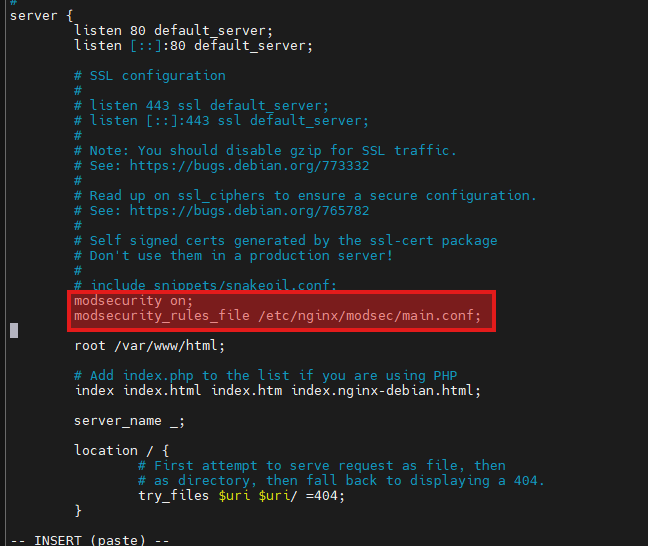
/etc/nginx/sites-available/default > /etc/nginx/modsec/main.conf 참조 > /etc/nginx/modsec/modsecurity.conf 참조
1.3.7 NGINX 설정 오류 확인과 unicode.mapping 복제
nginx -t를 사용하면 서버가 동작하지 않고 오류가 발생한다는 사실을 알 수 있다.
nginx -t
/etc/nginx/modsec/unicode.mapping 파일이 없다는 메시지이므로 이 파일을 찾아보자.
find / -name unicode.mapping

/root/ModSecurity/nginx-1.18.0/ModSecurity-nginx/.github/nginx/unicode.mapping
/root/ModSecurity/unicode.mapping
/root/ModSecurity/ModSecurity-nginx/.github/n
파일을 복제한다.
cp /root/ModSecurity/unicode.mapping /etc/nginx/modsec/unicode.mapping
다시 nginx -t
nginx -t
nginx: the configuration file /etc/nginx/nginx.conf syntax is ok
nginx: configuration file /etc/nginx/nginx.conf test is successful
성공 메시지가 뜬다면 다음 명령어로 서버를 재시작 한다.
service nginx restart

1.3.8 모드 시큐리티 동작 테스트
정상 요청인 경우에는 다음과 같이 웹페이지가 나온다.
root@modesecurity:~/ModSecurity/nginx-1.18.0# curl localhost
<!DOCTYPE html>
<html>
<head>
<title>Welcome to nginx!</title>
<style>
    body {
        width: 35em;
        margin: 0 auto;
        font-family: Tahoma, Verdana, Arial, sans-serif;
    }
</style>
</head>
<body>
<h1>Welcome to nginx!</h1>
<p>If you see this page, the nginx web server is successfully installed and
working. Further configuration is required.</p>

<p>For online documentation and support please refer to
<a href="http://nginx.org/">nginx.org</a>.<br/>
Commercial support is available at
<a href="http://nginx.com/">nginx.com</a>.</p>

<p><em>Thank you for using nginx.</em></p>
</body>
</html>
TCPdump
root@modesecurity:~/ModSecurity/nginx-1.18.0# tcpdump -i any -nn tcp port 80
tcpdump: verbose output suppressed, use -v or -vv for full protocol decode
listening on any, link-type LINUX_SLL (Linux cooked v1), capture size 262144 bytes
09:33:22.514292 IP 127.0.0.1.33066 > 127.0.0.1.80: Flags [S], seq 925460785, win 65495, options [mss 65495,sackOK,TS val 2082303473 ecr 0,nop,wscale 7], length 0
09:33:22.514304 IP 127.0.0.1.80 > 127.0.0.1.33066: Flags [S.], seq 635275776, ack 925460786, win 65483, options [mss 65495,sackOK,TS val 2082303473 ecr 2082303473,nop,wscale 7], length 0
09:33:22.514315 IP 127.0.0.1.33066 > 127.0.0.1.80: Flags [.], ack 1, win 512, options [nop,nop,TS val 2082303473 ecr 2082303473], length 0
09:33:22.514836 IP 127.0.0.1.33066 > 127.0.0.1.80: Flags [P.], seq 1:74, ack 1, win 512, options [nop,nop,TS val 2082303473 ecr 2082303473], length 73: HTTP: GET / HTTP/1.1
09:33:22.514847 IP 127.0.0.1.80 > 127.0.0.1.33066: Flags [.], ack 74, win 512, options [nop,nop,TS val 2082303474 ecr 2082303473], length 0
09:33:22.515279 IP 127.0.0.1.80 > 127.0.0.1.33066: Flags [P.], seq 1:250, ack 74, win 512, options [nop,nop,TS val 2082303474 ecr 2082303473], length 249: HTTP: HTTP/1.1 200 OK
09:33:22.515355 IP 127.0.0.1.33066 > 127.0.0.1.80: Flags [.], ack 250, win 511, options [nop,nop,TS val 2082303474 ecr 2082303474], length 0
09:33:22.515905 IP 127.0.0.1.33066 > 127.0.0.1.80: Flags [F.], seq 74, ack 250, win 512, options [nop,nop,TS val 2082303475 ecr 2082303474], length 0
09:33:22.515929 IP 127.0.0.1.80 > 127.0.0.1.33066: Flags [F.], seq 250, ack 75, win 512, options [nop,nop,TS val 2082303475 ecr 2082303475], length 0
09:33:22.515933 IP 127.0.0.1.33066 > 127.0.0.1.80: Flags [.], ack 251, win 512, options [nop,nop,TS val 2082303475 ecr 2082303475], length 0
룰을 정한 부분에 규칙을 맞춰서 testparam=test 파라미터를 전송하면 403 오류를 보낸다.
root@modesecurity:~/ModSecurity/nginx-1.18.0# curl localhost?testparam=test
<html>
<head><title>403 Forbidden</title></head>
<body>
<center><h1>403 Forbidden</h1></center>
<hr><center>nginx/1.18.0 (Ubuntu)</center>
</body>
</html>
TCPdump

1. TCP 연결(3-way handshacke) 정상 수립
127.0.0.1.43304 > 127.0.0.1.80   [S]     (클라이언트가 연결 시작)
127.0.0.1.80    > 127.0.0.1.43304 [S.]    (서버가 수락)
127.0.0.1.43304 > 127.0.0.1.80   [.]     (클라이언트가 확인)
- 클라이언트: 127.0.0.1.80: 43304 (curl이 임시로 잡은 포트)
- 서버: 127.0.0.1:80 (nginx)
✅ 여기까지는 "네트워크/포트/리스닝" 전부 정상
2. HTTP 요청이 실제로 전송됨
... length 88: HTTP: GET /?testparam=test HTTP/1.1- testparm=test가 포함된 GET 요청이 nginx로 들어갔다
- 즉, 요청이 ModSecurity까지 도달했다
3. 서버가 403 Forbidden으로 응답(차단 발생)
... length 326: HTTP: HTTP/1.1 403 Forbidden- nginx(ModSecurity nginx에게 지시)가 요청을 거부해서 403을 리턴했다
내가 적용한 rule에 의해
SecRule ARGS:testparam "@contains test" "id:1234,deny,status:403"
4. 연결 종료
127.0.0.1.43304 > 127.0.0.1.80: Flags [F.] (클라이언트가 종료 요청)
127.0.0.1.80 > 127.0.0.1.43304: Flags [F.] (서버도 종료)
127.0.0.1.43304 > 127.0.0.1.80: Flags [.] (마지막 확인 FIN+ACK)
- 비정상 RST가 아니라 FIN으로 깔끔하게 닫혔고,
- 차단 후 응답을 준 다음 연결을 종료한 전형적인 흐름입니다.
3. 웹 방화벽 프록시 설정
- Web을 프록시해주는 WAS가 있다
- 클라이언트 <-> WAS <-> Web
- HTTPS 통신을 할 때 클라이언드와 WAS 간의 암호화를 지원해줌
- WAS에서 데이터를 복호화해서 WAF에서 공격인지 확인함
- 그리고 WAS가 중개해서 Web으로 보내줌
3-1) 웹서비스 기본 페이지 접속들은 오류 페이지로 연결
기본 라우팅은 404로 설정
vim /etc/nginx/sites-available/defaultserver {
listen 80 default_server;
listen [::]:80 default_server;
root /var/www/html;
location / {
try_files /index.html =404;
}
}
설정 파일에 문제가 있는지 확인하고 재시작
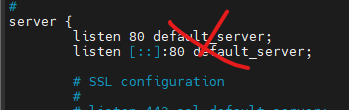
- duplicate 관련 에러가 발생하는 경우 설정 파일에서 default_server라는 단어를 지운다.
# vi /etc/nginx/sites-available/defaultserver {
listen 80;
listen [::]:80;
....
nginx -t
service nginx restart
설정후 index.html 파일을 생성
echo error > /var/www/html/index.html
설정 파일 확인 후 재시작하고 127.0.0.1로 웹 요청을 수행하면 error를 반환한다.
# nginx -t
# service nginx restart

#curl 127.0.0.1
error

3-2) 도메인 이름으로 접속하는 경우에만 서비스로 연결
도메인 이름으로 접근하는 경우에만 프록시 서버로 연결되도록 설정
vim /etc/nginx/sites-available/test-serverserver {
listen 80;
server_name boanproject.com; # 여기에 도메인 이름
location / {
proxy_buffers 16 4k; # 파일이 크면 크게 설정해야한다
proxy_buffer_size 2k;
proxy_pass https://www.naver.com; # was가 어디로 넘겨줄건지: 네이버로
}
modsecurity on;
modsecurity_rules_file /etc/nginx/modsec/main.conf;
}
[동작 과정]
- 클라이언트가 boanproject.com 도메인으로 접속하면
- WAS 프록시에서 WAF를 활용해 정상요청인지, rule을 확인한다
- 문제가 없으면 naver에 대신 질의해서 데이터를 가져오게한다
vim /etc/nginx/nginx.conf를 실행하고 http에 include 추가
...
http {
    include       /etc/nginx/sites-enabled/*;

소프트 링크를 통해서 enabled 디렉토리에 파일 배치
ln -s /etc/nginx/sites-available/* /etc/nginx/sites-enabled/
소프트 링크가 구성된 것을 확인할 수 있다.
# ls -la /etc/nginx/sites-enabled/
lrwxrwxrwx 1 root root   34 Jun 16 08:04 default -> /etc/nginx/sites-available/default
lrwxrwxrwx 1 root root   38 Jun 17 00:11 test-server -> /etc/nginx/sites-available/test-server
이 설정들이 nginx.conf에 적용이 될것이다
nginx -t로 문제 없는지 확인
root@modesecurity:~/ModSecurity/nginx-1.18.0# nginx -t
nginx: [warn] conflicting server name "_" on 0.0.0.0:80, ignored
nginx: [warn] conflicting server name "boanproject.com" on 0.0.0.0:80, ignored
nginx: [warn] conflicting server name "_" on [::]:80, ignored
nginx: the configuration file /etc/nginx/nginx.conf syntax is ok
nginx: configuration file /etc/nginx/nginx.conf test is successful

root@modesecurity:~/ModSecurity/nginx-1.18.0# service nginx restart
3-3) boanproject.com을 도메인 등록 후 테스트
/etc/hosts 다음 내용을 추가해 도메인 등록
127.0.0.1 boanproject.com

보안프로젝트로 웹요청을 수행하면 네이버 서비스로 접근해 페이지를 받아오는것을 확인할 수 있다.
curl boanproject.com | grep naver.com

기본 TCPdump

WAS에서 WAF 동작 확인 TPCdump
user1@modesecurity:~$ curl -i -H "Host: boanproject.com" http://127.0.0.1/?testparam=test
HTTP/1.1 403 Forbidden
Server: nginx/1.18.0 (Ubuntu)
Date: Thu, 05 Feb 2026 10:26:22 GMT
Content-Type: text/html
Content-Length: 162
Connection: keep-alive

<html>
<head><title>403 Forbidden</title></head>
<body>
<center><h1>403 Forbidden</h1></center>
<hr><center>nginx/1.18.0 (Ubuntu)</center>
</body>
</html>
여기서 핵심은 Host: boanproject.com을 강제로 넣었다는 것.
- nginx는 server_name boanproject.com; 인 server 블록에만
- proxy_pass ...
- modsecurity on;
- modsecurity_rules_file ...
를 적용해놨어요.
- 그런데 IP로 접속하면 기본 Host 헤더가 127.0.0.1 또는 211.183.3.128이 되면서
server_name boanproject.com과 매칭이 안 돼서 default 서버(정적 페이지) 로 가버릴 수 있어요. - 반대로 -H "Host: boanproject.com"을 넣으면, nginx가 정확히 그 boanproject.com 서버블록으로 라우팅합니다.
그래서 그 server 블록 안에 있는 ModSecurity 룰(ARGS:testparam 검사)이 정확히 적용되어 403이 난 거예요.

4. 웹 방화벽에 코어 룰셋 설치와 감사 로그 확인
- 보안솔루션은 시각화가 중요하다
- 우리는 콘솔로보긴함
4-1) 모드 시큐리티 로그 확인하기
# cat /var/log/modsec_audit.log


[05/Feb/2026:10:26:50 +0000] 177028721053.327950 127.0.0.1 60890 127.0.0.1 80
---rrL5DoDv---B--
GET /?testparam=test HTTP/1.1
Host: boanproject.com
User-Agent: curl/7.68.0
Accept: */*

---rrL5DoDv---D--

---rrL5DoDv---F--
HTTP/1.1 403

---rrL5DoDv---H--
ModSecurity: Access denied with code 403 (phase 1). Matched "Operator `Contains' with parameter `test' against variable `ARGS:testparam' (Value: `test' ) [file "/etc/nginx/modsec/main.conf"] [line "8"] [id "1234"] [rev ""] [msg ""] [data ""] [severity "0"] [ver ""] [maturity "0"] [accuracy "0"] [hostname "127.0.0.1"] [uri "/"] [unique_id "177028721053.327950"] [ref "o0,4v16,4"]
127.0.0.1 60890에서 127.0.0.1 80으로 접근했을 때
- Warning = 룰이 매칭은 됐는데 차단까지는 안 함
- Access denied with code 403 = 룰이 매칭됐고 deny 동작이 수행됨(차단)
탐지만 하도록 변경
공격해보기 위해서
# vi /etc/nginx/modsec/modsecurity.conf


SecRuleEngine DetectionOnly # On을 DetectionOnly로 변경
4-2) 무료로 제공하는 코어 룰 셋 설치
cd ~
wget https://github.com/coreruleset/coreruleset/archive/v3.2.0.tar.gz #룰셋 다운로드
tar -xvf v3.2.0.tar.gz
mkdir /etc/nginx/modsec/owasp-modsecurity-crs
cp coreruleset-3.2.0/crs-setup.conf.example /etc/nginx/modsec/owasp-modsecurity-crs/crs-setup.conf  #만든 디렉토리에 룰셋 copy
cp -r coreruleset-3.2.0/rules /etc/nginx/modsec/owasp-modsecurity-crs/rules
cd /etc/nginx/modsec/owasp-modsecurity-crs/rules # 여기에룰들이 있다
ls
임포트할 conf 파일을 정의해보자.
vim /etc/nginx/modsec/main.conf 에 붙여넣기
include modsecurity.conf
include owasp-modsecurity-crs/crs-setup.conf
# include owasp-modsecurity-crs/rules/REQUEST-900-EXCLUSION-RULES-BEFORE-CRS.conf
include owasp-modsecurity-crs/rules/REQUEST-901-INITIALIZATION.conf
include owasp-modsecurity-crs/rules/REQUEST-903.9001-DRUPAL-EXCLUSION-RULES.conf
include owasp-modsecurity-crs/rules/REQUEST-903.9002-WORDPRESS-EXCLUSION-RULES.conf
include owasp-modsecurity-crs/rules/REQUEST-903.9003-NEXTCLOUD-EXCLUSION-RULES.conf
include owasp-modsecurity-crs/rules/REQUEST-903.9004-DOKUWIKI-EXCLUSION-RULES.conf
include owasp-modsecurity-crs/rules/REQUEST-903.9005-CPANEL-EXCLUSION-RULES.conf
include owasp-modsecurity-crs/rules/REQUEST-903.9006-XENFORO-EXCLUSION-RULES.conf
include owasp-modsecurity-crs/rules/REQUEST-905-COMMON-EXCEPTIONS.conf
include owasp-modsecurity-crs/rules/REQUEST-910-IP-REPUTATION.conf
include owasp-modsecurity-crs/rules/REQUEST-911-METHOD-ENFORCEMENT.conf
include owasp-modsecurity-crs/rules/REQUEST-912-DOS-PROTECTION.conf
include owasp-modsecurity-crs/rules/REQUEST-913-SCANNER-DETECTION.conf
include owasp-modsecurity-crs/rules/REQUEST-920-PROTOCOL-ENFORCEMENT.conf
include owasp-modsecurity-crs/rules/REQUEST-921-PROTOCOL-ATTACK.conf
include owasp-modsecurity-crs/rules/REQUEST-930-APPLICATION-ATTACK-LFI.conf
include owasp-modsecurity-crs/rules/REQUEST-931-APPLICATION-ATTACK-RFI.conf
include owasp-modsecurity-crs/rules/REQUEST-932-APPLICATION-ATTACK-RCE.conf
include owasp-modsecurity-crs/rules/REQUEST-933-APPLICATION-ATTACK-PHP.conf
include owasp-modsecurity-crs/rules/REQUEST-934-APPLICATION-ATTACK-NODEJS.conf
include owasp-modsecurity-crs/rules/REQUEST-941-APPLICATION-ATTACK-XSS.conf
include owasp-modsecurity-crs/rules/REQUEST-942-APPLICATION-ATTACK-SQLI.conf
include owasp-modsecurity-crs/rules/REQUEST-943-APPLICATION-ATTACK-SESSION-FIXATION.conf
# include owasp-modsecurity-crs/rules/REQUEST-933-APPLICATION-ATTACK-JAVA.conf
include owasp-modsecurity-crs/rules/REQUEST-949-BLOCKING-EVALUATION.conf
include owasp-modsecurity-crs/rules/RESPONSE-950-DATA-LEAKAGES.conf
include owasp-modsecurity-crs/rules/RESPONSE-951-DATA-LEAKAGES-SQL.conf
include owasp-modsecurity-crs/rules/RESPONSE-952-DATA-LEAKAGES-JAVA.conf
include owasp-modsecurity-crs/rules/RESPONSE-953-DATA-LEAKAGES-PHP.conf
include owasp-modsecurity-crs/rules/RESPONSE-954-DATA-LEAKAGES-IIS.conf
include owasp-modsecurity-crs/rules/RESPONSE-959-BLOCKING-EVALUATION.conf
include owasp-modsecurity-crs/rules/RESPONSE-980-CORRELATION.conf
# include owasp-modsecurity-crs/rules/RESPONSE-999-EXCLUSION-RULES-AFTER-CRS.conf
이전의 룰은 주석처리하자

다음 파일 내용에 있는 룰 ID를 모두 주석처리
이유: 위에 룰들과 충돌이나서 에러가난다
vim /etc/nginx/modsec/modsecurity.conf

nginx restart 하고 문제 없는지 확인
root@modesecurity:/etc/nginx/modsec/owasp-modsecurity-crs/rules# nginx -t
nginx: [warn] conflicting server name "_" on 0.0.0.0:80, ignored
nginx: [warn] conflicting server name "boanproject.com" on 0.0.0.0:80, ignored
nginx: [warn] conflicting server name "_" on [::]:80, ignored
nginx: the configuration file /etc/nginx/nginx.conf syntax is ok
nginx: configuration file /etc/nginx/nginx.conf test is successful
root@modesecurity:/etc/nginx/modsec/owasp-modsecurity-crs/rules# service nginx restart
root@modesecurity:/etc/nginx/modsec/owasp-modsecurity-crs/rules# service nginx status
* nginx.service - A high performance web server and a reverse proxy server
     Loaded: loaded (/lib/systemd/system/nginx.service; enabled; vendor preset: enabled)
     Active: active (running) since Thu 2026-02-05 10:46:28 UTC; 7s ago
       Docs: man:nginx(8)
    Process: 107565 ExecStartPre=/usr/sbin/nginx -t -q -g daemon on; master_process on; (code=exited, status=0/SUCCESS)
    Process: 107582 ExecStart=/usr/sbin/nginx -g daemon on; master_process on; (code=exited, status=0/SUCCESS)
   Main PID: 107589 (nginx)
      Tasks: 2 (limit: 2212)
     Memory: 68.1M
     CGroup: /system.slice/nginx.service
             |-107589 nginx: master process /usr/sbin/nginx -g daemon on; master_process on;
             `-107590 nginx: worker process

Feb 05 10:46:27 modesecurity systemd[1]: Starting A high performance web server and a reverse proxy server...
Feb 05 10:46:28 modesecurity nginx[107565]: nginx: [warn] conflicting server name "_" on 0.0.0.0:80, ignored
Feb 05 10:46:28 modesecurity nginx[107565]: nginx: [warn] conflicting server name "boanproject.com" on 0.0.0.0:80, ignored
Feb 05 10:46:28 modesecurity nginx[107565]: nginx: [warn] conflicting server name "_" on [::]:80, ignored
Feb 05 10:46:28 modesecurity nginx[107582]: nginx: [warn] conflicting server name "_" on 0.0.0.0:80, ignored
Feb 05 10:46:28 modesecurity nginx[107582]: nginx: [warn] conflicting server name "boanproject.com" on 0.0.0.0:80, ignored
Feb 05 10:46:28 modesecurity nginx[107582]: nginx: [warn] conflicting server name "_" on [::]:80, ignored
Feb 05 10:46:28 modesecurity systemd[1]: Started A high performance web server and a reverse proxy server.
root@modesecurity:/etc/nginx/modsec/owasp-modsecurity-crs/rules#
'보안 > 보안 도구 실습' 카테고리의 다른 글
| [인프라 네트워크 구성] - 3. 방화벽(pfSense) 및 DMZ 설정 (0) | 2026.03.05 |
|---|---|
| [인프라 네트워크 구성] - 2. VyOS 라우터 설치와 기본 네트워크 설정 (0) | 2026.02.15 |
| [인프라 네트워크 구성] - 1. 가상 스위치를 사용한 네트워크 분리 (0) | 2026.02.15 |
| [실습 환경 구성] - 2. Ubuntu 설치 및 KaliLinux 배포 (0) | 2026.02.15 |
| [실습 환경 구성] - 1. VMWare ESXi 개념 및 설치 (0) | 2026.02.15 |